As a developer, when working on a Microsoft Dynamics CRM instance you might come across a situation where you might have to update legacy data.
I recently came across this situation.
Problem: There are 2 sets of Date/Time fields. One set is on the out of the box opportunity entity and another is one of our custom entities – opportunity pay (OP). A set comprises the start time (ST) and end time (ET). Opportunity and OP have a 1-1 relationship. The OP record is based on the data from the opportunity entity. The date/time fields in the opportunity entity were set to Time-Zone Independent. The date/time fields in the OP entity were set to User Local. I know, bad design. I completely missed it when I initially designed it. The data is updated through plugins. Since the ST, ET was based on the user who triggers the plugin’s local time zone (our organization is used by users across the United States), there was a lot of mismatch between the ST, ET in the opportunity record and the corresponding OP record.
CRM SELECTION CHECKLIST

Possible Solutions: The solution/fix needed for this is to get the OP record sorted out with the correct ST, ET matching the opportunity record. There are 3 ways in which you can develop a solution for this issue.
- Doing an advanced find to find the offending records, select the records and run a CRM workflow on it.
- Updating through the Database directly
- Console application
When I did an advanced find, I realized that there were a lot of records that had to be updated. Hence, updating through the workflow will put a tremendous amount of load on our async server (Workflow jobs are run through the organization’s async server) which we definitely wanted to avoid. Updating through the database is not recommended and hence we decided to go for a console application.
Final Solution:
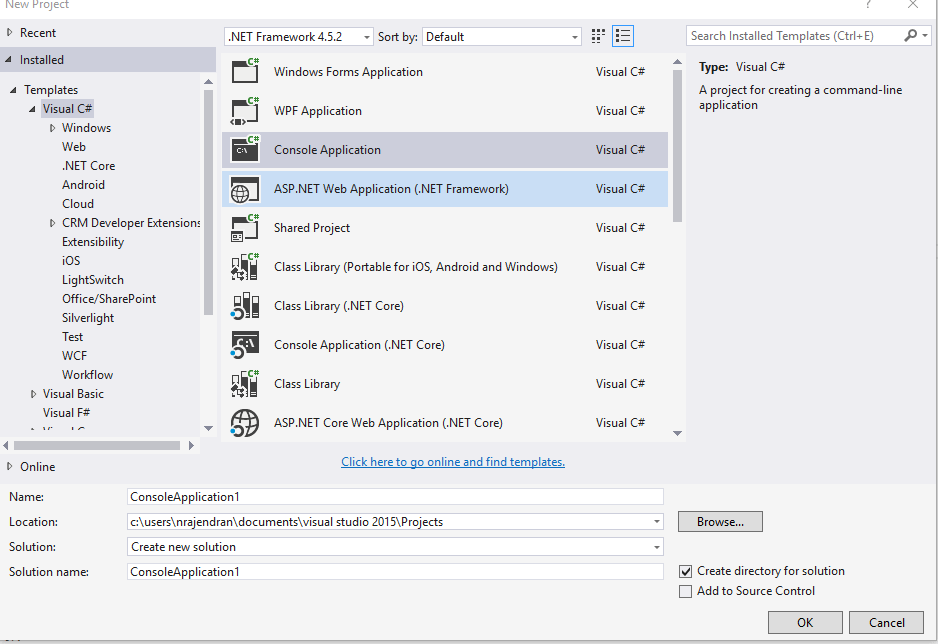
Go to Visual Studio. File/New/Project. Select Console Application. Give a suitable name for your project.
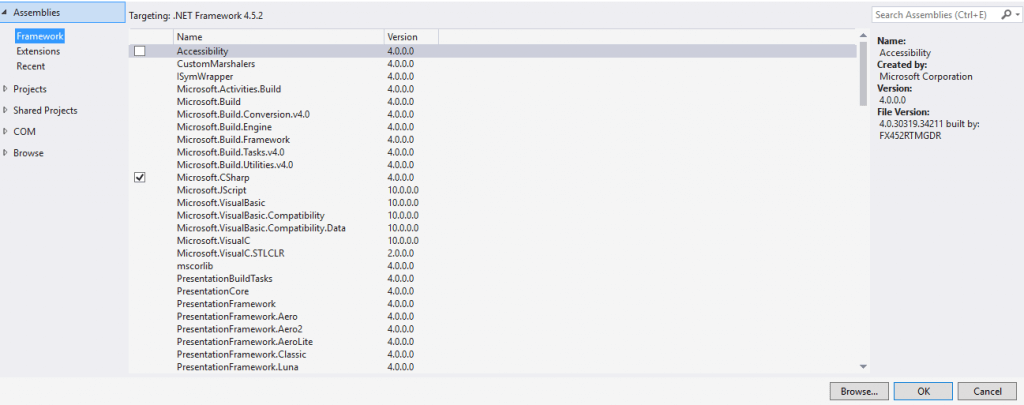
- Make sure the following references are added.
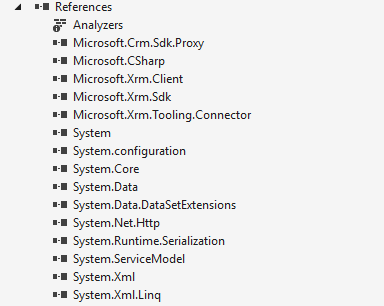
NOTE: To add a reference, right-click on add references. You’ll see a window similar to the one below. You will find some of the references in the framework section and some in the extensions section. You will also need to get some of the references from the SDK Bin folder.
For example, the Microsoft.Xrm.Tooling.Connector. You will find it in the SDK->Bin folder. So please ensure that you’re searching for your reference from all these locations if you’re not able to find the one needed.
- Once this is done, paste the below code. NOTE: The logic is written in such a way below that it only updates records within a certain timeframe given as input by the users.
using System;
using System.Configuration;
using Microsoft.Xrm.Sdk;
using Microsoft.Crm.Sdk.Messages;
using Microsoft.Xrm.Tooling.Connector;
using Microsoft.Xrm.Sdk.Query;
namespace Dynamics_365_Demo
{
class Program
{
static void Main(string[] args)
{
IOrganizationService _service;
try
{
Console.WriteLine(“Setting up Dynamics 365 connection”);
//Create the Dynamics 365 Connection:
string connectionString = ConfigurationManager.ConnectionStrings[“DEV_Connection”].ConnectionString;
CrmServiceClient devConnection = new CrmServiceClient(connectionString);
//Create the IOrganizationService:
_service = (IOrganizationService)devConnection.OrganizationWebProxyClient != null ?
(IOrganizationService)devConnection.OrganizationWebProxyClient :
(IOrganizationService)devConnection.OrganizationServiceProxy;
Console.WriteLine(“Validating Connection”);
if (_service != null)
{
//Get the current user ID:
Guid userid = ((WhoAmIResponse)_service.Execute(new WhoAmIRequest())).UserId;
if (userid != Guid.Empty)
{
Console.WriteLine(“Connection Successful!:”+userid);
int onOrAfterYear = Int32.Parse(args[0]);
int onOrAfterMonth = Int32.Parse(args[1]);
int onOrAfterDate = Int32.Parse(args[2]);
int onOrBeforeYear = Int32.Parse(args[3]);
int onOrBeforeMonth = Int32.Parse(args[4]);
int onOrBeforeDate = Int32.Parse(args[5]);
DateTime onOrAfterTime = new DateTime(onOrAfterYear, onOrAfterMonth, onOrAfterDate, 0, 0, 0);
DateTime onOrBeforeTime = new DateTime(onOrBeforeYear, onOrBeforeMonth, onOrBeforeDate, 0, 0, 0);
QueryExpression queryExpression = new QueryExpression(“mf_opportunitypay”);
queryExpression.ColumnSet = new ColumnSet(“mf_event”, “mf_eventstart”,”mf_eventend”, “statecode”, “statuscode”);
queryExpression.PageInfo = new PagingInfo();
queryExpression.PageInfo.Count = 5000;
queryExpression.PageInfo.PageNumber = 1;
queryExpression.PageInfo.ReturnTotalRecordCount = true;
queryExpression.Criteria.AddCondition(new ConditionExpression(“bamf_eventstart”, ConditionOperator.OnOrAfter, onOrAfterTime));
queryExpression.Criteria.AddCondition(new ConditionExpression(“bamf_eventstart”, ConditionOperator.OnOrBefore, onOrBeforeTime));
queryExpression.Criteria.AddCondition(new ConditionExpression(“statecode”, ConditionOperator.Equal, 0));
queryExpression.Orders.Add(new OrderExpression(“mf_eventstart”, OrderType.Ascending));
EntityCollection ppEvents = _service.RetrieveMultiple(queryExpression);
EntityCollection finalPPEvents = new EntityCollection();
foreach (Entity finalEvent in ppEvents.Entities)
{
finalPPEvents.Entities.Add(finalEvent);
}
do
{
queryExpression.PageInfo.PageNumber += 1;
queryExpression.PageInfo.PagingCookie = ppEvents.PagingCookie;
ppEvents = _service.RetrieveMultiple(queryExpression);
foreach (Entity opportunity in ppEvents.Entities)
finalPPEvents.Entities.Add(opportunity);
} while (ppEvents.MoreRecords);
int i = 0;
Console.WriteLine(“Data fetched:number of events is:” + finalPPEvents.Entities.Count);
foreach (Entity ppEvent in finalPPEvents.Entities)
{
Console.WriteLine(i.ToString() + “:” + ppEvent.GetAttributeValue(“mf_event”).Name);
i++;
DateTime ppEventStart = ppEvent.GetAttributeValue(“mf_eventstart”);
DateTime ppEventEnd = ppEvent.GetAttributeValue(“mf_eventend”);
Guid eventId = ppEvent.GetAttributeValue(“mf_event”).Id;
Entity eventRecord = _service.Retrieve(“opportunity”, eventId, new ColumnSet(“mf_eventstart”,”mf_eventend”));
DateTime eventStart = eventRecord.GetAttributeValue(“mf_eventstart”);
DateTime eventEnd = eventRecord.GetAttributeValue(“mf_eventend”);
if (ppEventStart != eventStart || ppEventEnd != eventEnd)
{
Entity ppEventToUpdate = new Entity(“bamf_partypayevent”);
ppEventToUpdate.Id = ppEvent.Id;
ppEventToUpdate[“mf_eventstart”] = eventStart;
ppEventToUpdate[“mf_eventend”] = eventEnd;
_service.Update(ppEventToUpdate);
Console.WriteLine(“Record updated”);
}
}
Console.ReadKey();
}
}
else
{
Console.WriteLine(“Connection failed…”);
}
}
catch (Exception ex)
{
Console.WriteLine(“Error – ” + ex.ToString());
}
Console.ReadKey();
}
}
}
- The app config file should look like the following:
<?xml version=”1.0″ encoding=”utf-8″ ?>
<configuration>
<startup>
<supportedRuntime version=”v4.0″ sku=”.NETFramework,Version=v4.5.2″ />
</startup>
<connectionStrings>
<add name=”DEV_Connection” connectionString=”AuthType=AD;Url= Enter URL here;Username=Enter user name here;Password = Enter password here;” />
</connectionStrings>
</configuration>
- I faced a lot of issues in finding the connection string for my organization. The way I found the connection string for my organization is to go to XRM toolbox. Click on Connect. Select the connection which you want to see the connection string for. Click on the yellow highlighted button.
- Copy the connection string and replace the above config file with your connection string. (Goes after connectionString =”Your Connection string goes here…” Make sure the ; is added in the end after the password.
- NOTE- The above method is based on an assumption that you’re already connected to the organization through the XRM toolbox using the connection wizard, SDK login control or connection wizard.
- Once the code is ready to build the solution and your console application is ready.
With Dynamics, you can usher a transformation in the way your business operates. AhaApps knows that with the right custom-made solutions, one can get the best out of the CRM. Speak with us to know more.
Author’s bio:
Nikhil has been with AhaApps since 2017 as a Microsoft Dynamics CRM Developer. He is a driven CRM expert who is ready to fight off the challenges in the Dynamics world with his technical know-how and prowess. He is a sports enthusiast and loves to play tennis when he gets time. He is also a voracious reader and enjoys reading philosophical books.
How to resolve the issue with the display of D365 organization
Nikhil talks about how to address and resolve the problem with the display in Dynamics CRM in his blog. Have a read.